Double Dots 100pc. -3D Foam Circles, DDOTS
Stamp Mat Pad, SMP001
Funnel Tray, 31510
Designer Dries Clear Adhesive, 159723
Metal Tip for Adhesive Bottles, 352854
Memento Dye Ink Pad - Bamboo Leaves, TSMP707
Memento Dye Ink Pad - Tuxedo Black, TSMP900
Crystal Ultrafine Transparent Glitter, 85-glitter
Deluxe Flower Shaping Kit, HCST1-401
Ornate Borders and Pockets Die, HCD1-780
Brilliance Ink - Pearlescent Orchid, TSBL34
Small Classic Petunia Cling Stamp Set, HCPC-3785
Classic Petunia Bouquet Cling Stamp Set, HCPC-3787
Small Classic Petunia Die, HCD1-7139
Large Classic Petunia Die, HCD1-7140
Classic Petunia Bouquet Die, HCD1-7141
Classic Petunia Paper Collection, HCDP1-278
Other Products: Black and White Card Stock, Spectrum Nori Markers FL3;TN3;LG4;BP1;
Watch this tutorial to see how to shape the petunias https://youtu.be/KOy_qNB9OAk.
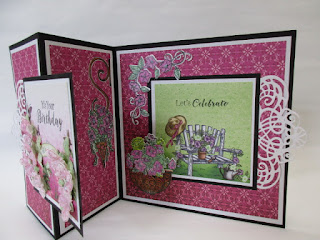
Instructions: Prepare your card base of black card stock 12" x 6" and score at 3", and 6", fold. Layer with white cardstock 1/4" smaller, then the Classic Petunia paper another 1/4" smaller. Cut two of the Ornate border dies . Place one on the right side of the back panel and the other on the left side of the front panel. Cut 2 - 3 1/2" x 3 1/2" pieces of black and place over the classic Petunia half. Layer it with 3 1/4 x 3 1/4 white and then place a piece of Classic Petunia paper on top and adhere on top of that as shown. Stamp every thing on white card stock with the black ink, color the leaves and flowers with Bamboo Leaves and Orchid ink. Color the hanging basket, pot and cornier vine with the Spectrum Noir Markers.
Stamp Mat Pad, SMP001
Funnel Tray, 31510
Designer Dries Clear Adhesive, 159723
Metal Tip for Adhesive Bottles, 352854
Memento Dye Ink Pad - Cottage Ivy, TSMP701
Memento Dye Ink Pad - Tuxedo Black, TSMP900
Crystal Ultrafine Transparent Glitter, 85-glitter
Deluxe Flower Shaping Kit, HCST1-401
Classic Rose Vines Cling Stamp Set, HCPC-3753
Classic Rose Vines Die, HCD1-7111
Elegant Border Basics Die, HCD1-7121
Nuvo Crystal Drops - Gloss White, NU651
Frilly Flourish Swirl - White Pearls, WT6106
Small Classic Petunia Cling Stamp Set, HCPC-3785
Small Classic Petunia Die, HCD1-7139
Classic Petunia Paper Collection, HCDP1-278
Other Products: White and Purple Card Stock, Spellbinders Stately and Standard Circles Die, Memento Grape Jelly ink
Watch this tutorial to see how to shape the petunias https://youtu.be/KOy_qNB9OAk.
Instructions: Prepare a card base with White Card Stock 5 x 7", topped with a piece of the purple print from the Classic Petunia Paper Collection 1 /8 inch smaller. Sponge the 4 sides with the Grape Jelly ink and adhere to card. Use the Elegant Border die and cut from the white card stock, mine measured about 6 7/8" x 3 1/2" before cutting. Add D-Dots to the back and adhere to card. Use the Stately Die and cut a circle out of the Purple card stock, add the the card. Cut a piece of Classic Petunia paper green using the Standard circle and add to the center of the Stately Circle. Locate the "Let's Celebrate" tag from the bottom of one of the sheets and add it to the center of the circles. Stamp the leaves and flowers on white card stock with the black ink. Color the leaves with the cottage Ivy and the Flowers with the Grape Jelly. Cut out, shape and adhere to the card. Cut the Frilly Flourish apart and add glue to the backs of 2 pieces, adhere to the card as shown. To finish add glitter and Crystal Drops.
Thanks for dropping by, be sure and drop by Heartfelt Creations blog to see my team mates beausitul creations for more inspiration!!


16 comments:
Well you totally outdid yourself this week. These are stunning!
Wow Olga...two incredibly gorgeous creations!!!
Both cards are fabulous. Love the shabbiness of the second one and the fun folds on the first.
Beautiful and stunning project!
Beautiful and stunning project!
Hi Olga what beautiful cards and the colours and design are wonderful.
Debs xxx
{Debs Cards}
so beautiful!!
What beautiful cards Olga! Love the frilly die cut on that first card and the swirls of pearls on the 2nd card.
How beautiful Olga! You have such beautiful detail!
Hugs Marie
Beautiful cards Olga! I love the way your first card opens to a lovely bench for special friends to celebrate a birthday!!! I also love the beautiful pearl spray on your second card, wow, really makes it elegant!
Beautiful cards!!
Now these are stunning. ♥[aNNie]
Your cards are beautiful, Olga - so delicate and sweet! hugs, de
Absolutely gorgeous!
beautiful cards Olga.
I love the fold on the first card and you are still the queen of flowers! Beautiful, my friend!
Post a Comment