Wednesday, September 30, 2015

WEDNESDAY WITH HEARTFELT CREATIONS

Hello again and welcome to another Inspiration Wednesday.  I have 2 new cards to share with you.

Products Used: 
Enchanted Dragonflies Cling Stamp Set
Enchanted Mum Bouquet Cling Stamp Set
Enchanted Dragonflies Die
Zip Dry Paper Glue
Scor-Pal Measuring & Scoring Board
Stamp Positioner Kit

Project Instructions: 
Other products: Spectrum Noir Markers PP2 & 3; LG1 & 2; BT3 & 4; Gold Marker, Gold Pearl Pen, Foam Sheet
Instructions: Prepare a card base 5" x 7". Cut another piece of white card stock 4 3/4" x 6 3/4" and run the Gold Marker along all 4 sides. Stamp 2 images, color and set aside. Stamp the sentiment, color and adhere on top of a piece of the foam, cut out and adhere to card base. Stamp the dragonflies, color, adhere to the foam, cut out and add to card. Drop drops of the Gold Pearl Pen around the card.


Products Used: 
Enchanted Mum Paper Collection
Enchanted Mum Cling Stamp Set
Enchanted Mum Die
Zip Dry Paper Glue
Scor-Pal Measuring & Scoring Board
Double Dots 100pc. -3D Foam Squares

Project Instructions: 
Other products: Black Card Stock, button, Spectrum Noir markers PP2-3; LG3Watch this video https://youtu.be/jJBwQyyza6g to learn how to shape the Enchanted Mums
Instructions: Prepare a card base 5" x 7". Cut a piece of Black 4 7/8" x 6 7/8". Cut a piece of the Enchanted Mum Paper 4 3/4" x 6 3/4" and layer it on top of the Black. Adhere to card base. Cut another piece of the black 3 5/8" x 5 5/8" and add another piece of the Enchanted Mum paper on top, adhere to the first piece at an angel as shown, and one more time at 2 5/8" x 4", place a piece of the paper on top and adhere to card. Cut a piece of black 3 7/8" x 4 3/4" and add one of the small card fronts on top of that one and add to card using Double Dots. Find and cut the sentiment piece out, using a corner rounder round the corners and with Double Dots add to card front. Now stamp the flower images twice, color and cut out. Shape and add placing a button in the center. Add Dragonflies around the card to finish.

 Thanks for taking time to drop by, have a wonderful week..............

Wednesday, September 23, 2015

WEDNESDAY WITH HEARTFELT CREATIONS

It's time for more wonderful Heartfelt Creations!!!!!  I'm here to share 2 new cards I made using the Enchanted Mums collection,  Hope you enjoy...


Other products: White Pearl Pen, Spectrum Noir Markers LG3 & 4; CT3 & 4; Spellbinders Grand Scalloped Ovals and Grand Ovals, Wink of Stella
Instructions: Prepare a card base 5" x 7". Cut a piece of the Enchanted Mum paper 4 3/4" x 6 3/4", adhere to card base. Cut a piece of yellow card stock out with the Scalloped Oval. Stamp the image on white card stock, color and cut out using the oval die. With the Double Dots place on the card as shown. Stamp the Dragonflies, color, cut out and adhere to card with tiny pieces of foam dots. Add the Pearl Pen around the yellow oval and Wink of Stella on the dragonflies and flowers.


Products Used: 
Single Enchanted Mum Cling Stamp Set
Zip Dry Paper Glue
Scor-Pal Measuring & Scoring Board
Stamp Positioner Kit
Shell White Glitter

Project Instructions: 
Other products: White Pearl Pen, Spectrum Noir Markers PP2 & 3; LG1 & 3; Gold Marker, Glitter


Instructions: Prepare a card base 5" x 7". Cut another piece of white card stock 4 3/4" x 6 3/4". Using the Gold Markers cover all four sides. Using the stamp positioner, stamp your sentiment and flowers. Color the flowers. Randomly put White Pearl Pen here and there and add glitter on top.

Wednesday, September 16, 2015

WEDNESDAY WITH HEARTFELT CREATIONS

Hello and thanks for dropping by.  I have 2 new cards to share with you today and hope you enjoy!!!
 Products Used: 
Other products: Spellbinders EL-005 embossing folder, Spectrum Noir Markers CT1 & 3; LG1 & 2; Gold Marker, Brilliance Galaxy Goldink pad, Foam Sheet
Watch this video https://youtu.be/jJBwQyyza6gto learn how to shape the Enchanted Mums.
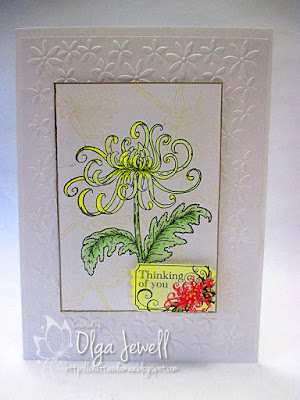
Instructions: Prepare a card base 5" x 7". Cut another piece of white card stock 4 3/4" x 6 3/4", using the embossing folder emboss and adhere to card base. Cut another piece of white card stock 3 1/2" x 5", stamp Enchanted Mum Bouquet all over with the Gold ink. Now stamp the Enchanted Mum Cluster in the center, color and add the foam sheet to the back and adhere to card base. Using the Luggage and Tags die, cut the tag out and adhere to card.

Other products: Spellbinders EL-005 embossing folder, Spectrum Noir Markers CT1 & 3; LG1 & 2; Gold Marker, Brilliance Galaxy Gold
ink pad, Foam Sheet

Instructions: Prepare a card base 5" x 7". Cut another piece of white card stock 4 3/4" x 6 3/4", using the embossing folder emboss and adhere to card base. Cut another piece of white card stock 3 1/2" x 5", stamp Enchanted Mum Bouquet all over with the Gold ink. Now stamp the Enchanted Mum Cluster in the center, color and add the foam sheet to the back and adhere to card base. Using the Luggage and Tags die, cut the tag out and adhere to card.
thanks for taking time to drop by..............

Wednesday, September 9, 2015

WEDNESDAY WITH HEARTFELT CREATIONS

Swing open the decorative wrought iron gates and escape to serene and alluring garden surroundings with the Heartfelt Creations Enchanted Mum Collection.  Take in the beauty of shimmering dragonflies as they glide through warm and gentle breezes, landing to perch on beautiful bouquets of chrysanthemums dancing in the sunlight.  Graceful flowing floral images and exquisite die cuts along with soft hues of pinks, purples, greens and yellows are sure to bring about a sense of peace and calm to your soul.  Create your very own impeccable garden themed designs with the assortment of light and airy mums taking centre stage in five gloriously illustrated stamp sets along with swirling vines and beautifully detailed dragonflies, all of which mirror the stunning images found within this enchanting paper collection.  Create authentic, true to life blossoms and embellishments with three coordinating dies, perfect to grace your scrapbook layouts and original card creations.  Whether you are celebrating special occasions or  preserving precious family memories, an enchanting time of creativity awaits you with the Enchanting Mum Collection. 

Be sure and watch this video on how to make gorgeous Mum flowers.
https://youtu.be/jJBwQyyza6g

 Products Used: 
Enchanted Mum Paper Collection
Enchanted Mum Bouquet Cling Stamp Set
Enchanted Mum Clusters Cling Stamp Set
Enchanted Mum Bouquet Die
Zip Dry Paper Glue
Scor-Pal Measuring & Scoring Board
Dove Blender Kit
Double Dots 100pc. -3D Foam Squares

Project Instructions: 
Other products: Spectrum Noir Makers LV1 & 2;LG2 & 3;TB1, Wink of Stella
Instructions: Prepare a card base 4" x 9". Cut a piece of the Enchanted Mum Paper 3 7/8" x 8 7/8" and adhere to card base. Stamp the 2 images, color and cut out. Cut the Enchanted Bouquet in half and using the D-Dots place one on each side of the card as shown. Stamp, color and cut out the Mum, trim so you have just the flower and adhere to card using the D-Dots. To finish add Wink of Stella.

Products Used: 
Enchanted Mum Paper Collection
Enchanted Mum Bouquet Cling Stamp Set
Enchanted Mum Clusters Cling Stamp Set
Enchanted Dragonflies Die
Enchanted Mum Bouquet Die
Zip Dry Paper Glue
Scor-Pal Measuring & Scoring Board
Dove Blender Kit
Double Dots 100pc. -3D Foam Squares

Project Instructions: 
Other products: KOH-I-NOOR Pencils 10; 14; 15; 16, Wink of Stella, Gold Liquid Pearls,Wink of Stella
Instructions: Prepare a card base 5" x 7". Cut a piece of the Enchanted Mum Paper 4 3/4" x 6 3/4" and adhere to card base. Stamp the Enchanted Dragonfly set and set aside. Stamp the Mum Cluster twice, color and blend and cut out using the die. Color and cut out the Dragonflies and sentiment, adhere to card, use the Double Dots on the sentiment to help it stand out. To finish add liquid pearl and Wink of Stella.

Wednesday, September 2, 2015

WEDNESDAY WITH HEARTFELT CREATIONS

Hello, hope everyone is great and happy! the weather is cooling down, flowers are dying down and I dread it, but summer is going away.  Seems like it's shorter every year.............
Anyway, I'm here to share what I've been up to with some Heartfelt Creations paper, stamps and dies.  Hope you like!!!!

Products Used: 
Farmers Market Paper Collection
Jars and Vines Cling Stamp Set
Jars and Vines Die
Classic Sunflower Cling Stamp Set
Classic Sunflower Die
Cut Mat Create 1B Die
Deluxe Flower Shaping Kit
Dove Blender Kit
Zip Dry Paper Glue
Art Institute Glue - Dries Clear

Project Instructions: 
Other products: Foam Sheet, Distress Inks Tea Dye, Mustard Seed and Spiced Marmalade, Old Olive Card Stock, Dots embossing folder by Cuttlebug, Copper Micro Beads

Watch this video https://youtu.be/AIYTYZzk1sgfor more ideas and examples of the Farmers Market Collection.

Instructions: Prepare your card base 5 1/2" x 5 1/2". Chose a piece of the 6" x 6" paper from the Farmers Market paper Collection and trim down to 5 3/8" x 5 3/8", distress all four edges and adhere to card base. Cut a piece of the green card stock 3 1/2" x 5", emboss with the dots folder, distress all four edges and add to card. Cut a piece of white card stock 4 3/4" x 2 1/2", layer on top of the last piece and add a piece of the Farmers Market paper 2 1/4" x 4 1/2" that you distress the edges on top of that. Stamp the vines, cut out and add to card. Cut one of the tags from the paper collection, glue on top of a piece of foam then add to your card. Stamp the Sunflowers, color, shade and cut out. Shape and add to the card. Watch this video to learn how to shape the flowers: https://youtu.be/faTpandFJLI. To finish add Copper Micro Beads to the center of the flowers.

Products Used: 
Farmers Market Paper Collection
Jars and Vines Cling Stamp Set
Jars and Vines Die
Zip Dry Paper Glue
Art Institute Glue - Dries Clear
Stamp Positioner Kit

Project Instructions: 
Other products: White Stickles, Ribbon, Distress ink Faded Jeans, Stampin Up ink Regal Rose, Rose Red and Certainly Celery,Spellbinders Standard Circles Large Die, Foam Sheet, Blue Gem, Martha Stewart Vintage Floral punch

Watch this video https://youtu.be/AIYTYZzk1sgfor more ideas and examples of the Farmers Market Collection.

Instructions: This card is 5 1/2" x 5 1/2", the next layer is 5 3/8" x 5 3/8". Cut a small piece of the Farmers Market paper 5 3/8" x 1 1/4" and place at the lower part of the card as shown. Take a piece of white card stock and cut it 5 3/8" x 3", using the punch go down both sides and adhere to card. Cut a small piece of the Farmers Market paper 5 3/8" x 2" and add on top of that one. Stamp the vines, cut out and adhere on top of that piece as shown. Cut 2 circles out using the dies of the foam. Cut another large circle out of the Farmers market paper, shade the edges and glue on top of the foam. Stamp the image, color and cut out with a smaller circle and adhere that one to a foam circle also. Add to your card. To finish the card add stickles to the berries and a ribbon.
Thanks for taking time to drop by and hope you have an amazing week!!!!!