Here is a short list of a few blogs I still can't comment on, I do go look and try but..............
Someone told me it isn't my blog, that the ones I can't comment on need to change from embedded to Full page, it's over my head but thought I would let you know........
1. Carla's Stamping Spot
2. Deb Artliff
3. Patricia @ Summer House Crafts
4. MaryAnne @ Lakeside
5. CeCe @ CW Card Creations
6. Caroline @ Stamping & Inklings
7. Bellisima Vida
Just to mention a few, I love your art work..................
Thursday, August 27, 2015
Wednesday, August 26, 2015
Wednesday with Heartfelt Creations
Hello, glad you could drop by today. I have 2 new projects to share with you using the New and amazing Framers Market Collection, hope you enjoy...
 Products Used:
Farmers Market Paper Collection
Apple Harvest Cling Stamp Set
Luggage and Tags Die
Art Institute Glue - Dries Clear
Scor-Pal Measuring & Scoring Board
Double Dots 100pc. -3D Foam Squares
Project Instructions:
 Products Used:
Farmers Market Paper Collection
Zip Dry Paper Glue
Art Institute Glue - Dries Clear
Project Instructions:

Farmers Market Paper Collection
Apple Harvest Cling Stamp Set
Luggage and Tags Die
Art Institute Glue - Dries Clear
Scor-Pal Measuring & Scoring Board
Double Dots 100pc. -3D Foam Squares
Project Instructions:
Other products: Red Card stock, Spectrum Noir Pens DR1, 2, 3; LG4; JG1; EB1, 2; TN1, 3; IG2; CT1, 2, 3, Foam Sheet, Grand Decorative Ovals One, Lace/Ribbon
Watch this video https://youtu.be/AIYTYZzk1sg for more ideas and examples of the Farmers Market Collection.
Instructions: Prepare a card base of 5" x 7". Cut a piece of the Farmers Market Paper down to 4 7/8" x 6 7/8". Attach the ribbon or lace to the left side and adhere to card base. Cut a piece of Red card stock 4" x 6 1/8", add a piece of the Farmers Market paper on top and foam sheet to the back, adhere to card. Stamp the image on white card stock, color and cut out using the oval die. Using Double Dots, adhere to card. To finish add the tag to the lower left hand corner.

Farmers Market Paper Collection
Zip Dry Paper Glue
Art Institute Glue - Dries Clear
Project Instructions:
Other products: Bottle, Ribbon
Watch this video https://youtu.be/AIYTYZzk1sg for more ideas and examples of the Farmers Market Collection.
Instructions: Cut a Card front from the Farmers Market Paper Collection, using the Art Institute Glue adhere to bottle. Tie a piece of Ribbon at the neck of the bottle.
Thank you so much for taking time to drop by. I did find out the reason I can't comment on some of your blogs is you have embedded clicked instead of Full Page. Hate I an't leave comments but at the same time was glad to learn it wasn't my computer. Yall' have fantastic week!!!
Friday, August 21, 2015
MINI WATERFALL
Hello, here to share with you how I made a Mini Waterfall Photo Keeper...
 This is a 8 1/2 x 7 Mini Waterfall picture album. You will need medium weight chipboard 8 ½ x 7
(2-one for the front and one for the back), then a piece 8 ½ x 2. You can make this smaller, wish now I had
made mine 1 ½ but it is what it is….
This is a 8 1/2 x 7 Mini Waterfall picture album. You will need medium weight chipboard 8 ½ x 7
(2-one for the front and one for the back), then a piece 8 ½ x 2. You can make this smaller, wish now I had
made mine 1 ½ but it is what it is….


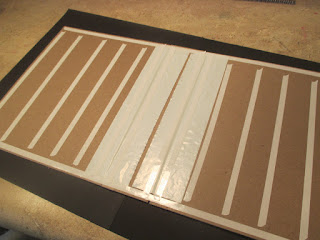
 Place score tape around the inside edges as shown in the
picture and on 2 pieces of strong plastic (I used a piece that some mail came
in)
Place score tape around the inside edges as shown in the
picture and on 2 pieces of strong plastic (I used a piece that some mail came
in)
 ut
those together as shown and be sure to space it so it will open and close
easily. This just reinforces it more.
ut
those together as shown and be sure to space it so it will open and close
easily. This just reinforces it more.
 Take 2 pieces of Black Card Stock and trim down to make it
11 x 11, Put Scor-tape on the two ends and put those together making one long
piece.
Take 2 pieces of Black Card Stock and trim down to make it
11 x 11, Put Scor-tape on the two ends and put those together making one long
piece.
 Now you are ready to place the chop board on face down and
rub hard getting all the scor tape to hold good.
Now you are ready to place the chop board on face down and
rub hard getting all the scor tape to hold good.
 Next apply lots of Scor-tape around top, bottom and in
between as shown.
Next apply lots of Scor-tape around top, bottom and in
between as shown.
 Now you are ready to place the chop board on face down and
rub hard getting all the scor tape to hold good. Trim all 4 corners as shown and apply more Scor –tape.
Now you are ready to place the chop board on face down and
rub hard getting all the scor tape to hold good. Trim all 4 corners as shown and apply more Scor –tape.

 Your album should look like this and ready to decorate.
 Put Scor-tape on the back and adhere to the chipboard.
 For the inside I forgot to tell you to cut a piece of black
card stock 4 x 8 3/8 to cover the center or spine.
For the inside I forgot to tell you to cut a piece of black
card stock 4 x 8 3/8 to cover the center or spine.

 Then you can add your paper to the inside and it’s ready for
the Waterfall.
Then you can add your paper to the inside and it’s ready for
the Waterfall.

 Cut 8-10 pieces of Black card stock 6 ¼ x 4 ½. Score and ¼
at the top of each and round the corners at the bottom of each. Adhere these starting at the top, and add the
next one at the scor line to the bottom of the last one. I added 3 magnets on every 3rd
page, this will help to keep it closed but you can omit this step if you wish.
Cut 8-10 pieces of Black card stock 6 ¼ x 4 ½. Score and ¼
at the top of each and round the corners at the bottom of each. Adhere these starting at the top, and add the
next one at the scor line to the bottom of the last one. I added 3 magnets on every 3rd
page, this will help to keep it closed but you can omit this step if you wish.


 Now you are ready to cut your paper and adhere both front
and back of the water fall.
Now you are ready to cut your paper and adhere both front
and back of the water fall.
 Now you are ready to decorate the front in side an out as
you want. I used the Sun Kissed Fleur
Stamps and dies to make my flowers and the leaves are from the cut Mat Create
set 251 2-A. On the inside also used
Spellbinders Decorative Labels 8 die to make a frame. The distress inks I used were Peeled Paint
and Mustard Seed.
Now you are ready to decorate the front in side an out as
you want. I used the Sun Kissed Fleur
Stamps and dies to make my flowers and the leaves are from the cut Mat Create
set 251 2-A. On the inside also used
Spellbinders Decorative Labels 8 die to make a frame. The distress inks I used were Peeled Paint
and Mustard Seed.
 Hope you enjoyed this and try one for your self. I love to make them and fill them up with photos...


I used Sunny Day Paper Collection. Trimming the front and back of both inside
and out down 1/8” all the way around.


Wednesday, August 19, 2015
Wednesday with Heartfelt Creations
Hello and welcome to Wednesday with Heartfelt Creations, I'm pleased to share with you tow of my creations this week, hope you enjoy!

Products Used:


Products Used:
Farmers Market Paper Collection
Jars and Vines Cling Stamp Set
Jars and Vines Die
Luggage and Tags Die
Zip Dry Paper Glue
Art Institute Glue - Dries Clear
Project Instructions:
Jars and Vines Cling Stamp Set
Jars and Vines Die
Luggage and Tags Die
Zip Dry Paper Glue
Art Institute Glue - Dries Clear
Project Instructions:
Other products: Bottle, Ribbon, Burlap, Foam
Sheet, Scor-Tape, White Card Stock, Garden Green, Bashful Blue and Real Red ink
Instructions: Select your bottle and measure
for the correct amount of burlap to wrap around. Using Scor-tape adhere to the
bottle. Now cut a piece of the Farmers Market Paper to wrap around the burlap
leaving an inch on the top and bottom to show the burlap. Stamp the vines,
color and cut. Now using the Vine die, cut out the leaves on the Foam Sheet.
Glue and place the vines on top, adhere to bottle. Cut the tag out, add ribbon
and drape over the bottle.

Products
Used:
Farmers Market Paper Collection
Apple Harvest Cling Stamp Set
Art Institute Glue - Dries Clear
Scor-Pal Measuring & Scoring Board
Stamp Positioner Kit
Project Instructions:
Farmers Market Paper Collection
Apple Harvest Cling Stamp Set
Art Institute Glue - Dries Clear
Scor-Pal Measuring & Scoring Board
Stamp Positioner Kit
Project Instructions:
Other products: Black Card stock, White card
stock, spectrum Noir Pens CR5; DR1 & 3, LG 3, 4 & 5
Instructions: Prepare a piece of black card
stock 10" x 7”, score at 5" making a card base of 5" x 7".
Cut a piece of white 3" x 6 1/8". Using the Stamp Positioner stamp
the Apple Harvest image and color. Cut a piece of the Farmers Market paper to 4
3/4" x 6 3/4". Adhere to card base. Cut another piece of the black 3
1/4" x 6 3/8”, adhere the colored image on top and then place on card
base.
Wednesday, August 12, 2015
Wednesday with Heartfelt Creations
Invigorate and
refresh you with the Farmers Market collection that’s as fresh as the scents of
basil and thyme and as sweet as fresh jams and jellies. Forget the hot,
steaming stressful stove ... making batches of paper crafted ‘peach marmalade’
is easy and yummy.
Add a delicious
touch to your flowers and paper crafted creations with this uplifting
collection of Artisan designs, garden vegetables and fruits, flowers and
original accents. This kind of edible collection has never before been produced
by Heartfelt Creations. The apples and peaches are juicy and ripe... indulge now.


Products Used:
Farmers Market Paper Collection
Jars and Vines Cling Stamp Set
Jars and Vines Die
Botanical Rose Cling Stamp Set
Botanical Wings Die
Deluxe Flower Shaping Kit
Zip Dry Paper Glue
Art Institute Glue - Dries Clear
Project Instructions:
Other products: Slate Wall Plaque by Darcie, Distress inks Tumbled Glass, Forest Moss and Blush Blossom by Stampin Up, Copper Micro Beads, Foam Sheet
Instructions: The Wall Plaque measures 7 1/2" x 5 1/2". I Cut the first layer down to 7" x 5", then I distressed and using the Zip Dry glue, adhered to the plaque. Next, I cut one of the card fronts and inked the edges, adhered to the first layer. Next, using Old Olive Card stock, stamp the vines, cut out, shade and set aside. Using the Vine Die some Foam Sheet, cut the vines out and glue the card stock vines on top, glue these on the card front. Stamp the flowers cut out, shade and shape. To view how to shape the flowers, visit: https://www.heartfeltcreations.us/howto?view=videos&videoID=67. Adhere to the plaque. To finish add Copper Micro Beads to the center of each flower.

Products Used:
Farmers Market Paper Collection
Berries and Peaches Cling Stamp Set
Farmers Market Fruit Die
Art Institute Glue - Dries Clear
Scor-Pal Measuring & Scoring Board
Stamp Positioner Kit
Project Instructions:
Farmers Market Paper Collection
Berries and Peaches Cling Stamp Set
Farmers Market Fruit Die
Art Institute Glue - Dries Clear
Scor-Pal Measuring & Scoring Board
Stamp Positioner Kit
Project Instructions:
Other products: Black Card stock, spectrum Noir Pens CR1, 3, 5; DG2; LG 4; BP1, Foam Sheet, Martha Stewart punch Vintage Floral, Wink of Stella
Instructions: Prepare a piece of black card stock 6" x 6". Cut a piece of the Farmers Market Paper 5 3/4" x 5 3/4" and adhere to base. Cut a piece of black 3 1/2" x 5 1/4", place another piece of the Farmers Market paper on that and adhere to the right side of the card. Take another piece of black 4 3/4" x 3" and punch both ends and adhere to the top of the last piece. Cut a piece of black 3 1/2" x 4 5/8", cut one of the card fronts from the paper pack, trim down to fit on the black and adhere to card. Using the Stamp Positioner, stamp the sentiment in the lower right hand corner. Set aside. Stamp the Peaches, color, cut out and adhere to the upper left hand corner. To finish, add Wink of Stella to the Peaches and flowers.
Thanks so much for taking time to drop by today, I'm out of town right now but will be back later and I'll drop by your blogs.......Until then
Happy Crafting!!!
Wednesday, August 5, 2015
Wednesday with Heartfelt Creations
I'm thrilled to be able to share 2 more of my cards this week I made using the wonderful products from Heartfelt Creations.

Products Used:
Sparkling Poinsettia Paper Collection
Sparkling Poinsettia Swirl Cling Stamp Set
Sparkling Poinsettia Cling Stamp Set
Sparkling Poinsettia Die
Holly Berry Cling Stamp Set
Ornamental Add On Die
Stamp Positioner Kit
Deluxe Flower Shaping Kit
Art Institute Glue - Dries Clear
Scor-Pal Measuring & Scoring Board
Project Instructions:
Products Used:
Sparkling Poinsettia Candle Cling Stamp Set
Stamp Positioner Kit
Art Institute Glue - Dries Clear
Scor-Pal Measuring & Scoring Board
Project Instructions:

Sparkling Poinsettia Paper Collection
Sparkling Poinsettia Swirl Cling Stamp Set
Sparkling Poinsettia Cling Stamp Set
Sparkling Poinsettia Die
Holly Berry Cling Stamp Set
Ornamental Add On Die
Stamp Positioner Kit
Deluxe Flower Shaping Kit
Art Institute Glue - Dries Clear
Scor-Pal Measuring & Scoring Board
Project Instructions:
Other products: Red and Yellow Stickles
Instructions: Prepare a card base 5" x 7", cut a 5" x 7" card front from the Sparkling Poinsettia Paper, using the Stamp Positioner stamp the sentiment. Adhere to card front and set aside. Stamp the leaves and flowers. (Watch this videohttps://www.heartfeltcreations.us/howto?view=videos&videoID=76 to learn how to shape the Sparkling Poinsettia.) Color of choice, cut out, shade, shape and add to card. To finish add the Stickles to the edge and center of the flower and berries on the leaves.


Sparkling Poinsettia Candle Cling Stamp Set
Stamp Positioner Kit
Art Institute Glue - Dries Clear
Scor-Pal Measuring & Scoring Board
Project Instructions:
Other products: White and Yellow Stickles, Spectrum Noir Markers CR9; DR2; LG1 &2; FL3, Pilot Gold Marker
Instructions: Prepare a card base 5" x 7", cut another piece of white 4 1/4" x 5 3/4". Using the Stamp Positioner, stamp the image and sentiment. Color the image. Using the Gold marker go along all four sides, adhere to card front. To finish add stickles to the candle and flowers.
Subscribe to:
Posts (Atom)