Friday, May 29, 2015

Cherish Memories


Hello, here to share the wall plaque I made for Heartfelt Creations this week, hope you enjoy...


Other Products: Pearls, Mod Podge, Stampin Up Garden Green and Rose Red ink, Wink of Stella Brush by ZIG, piece of prepared wood.
Instructions: Prepare your wood, apply Mod Podge all over it and cover with your Cascading Fuchsia paper. Trim to fit then apply Mod Podge on top and set aside. Adhere your lace and pearls to the top. Stamp your flowers and leaves. I stamped out 3 set of flowers so I could fill the board up. Color, cut out, shape and adhere to the hanging which is dry by now. Cut out the tags using the Luggage and Tags die and adhere to the Wall Hanging.
Thanks for dropping by....I'm off to Winston to take my husband to the Doctor, I'll visit soon.


Wednesday, May 27, 2015

Wednesday with Heartfelt Creations

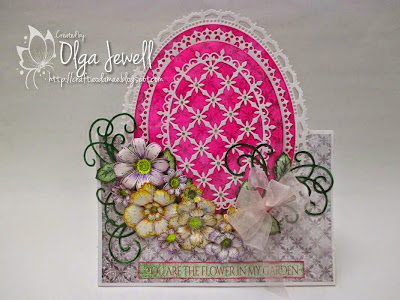
Hello, I'm happy to share my card this week using the wonderful papers, stamps and dies from Heartfelt Creations.

Products Used:
Other Products: Stampin Up Ink/Markers Lavender Lace, Positively Pink, Summer Sun, Glorious Green, and Garden Green, Gold and Yellow
Stickles, Spellbinders Grand Decorative Ovals One and Grand Ovals One and Ribbon.
Instructions: For instructions on how to cut and begin this 8 1/2" x 10" card click here. I added the loser part using the Cascading Fuchsia Paper, I also used more of the paper in between my oval layers which I inked with Stampin Up Positively Pink Ink. After I had all the ovals cut out and glued in placed I added Gold Stickles to the top Decorative oval and the sentiment strip and set it aside. I then stamped all my flowers and leaves. On the flowers I used more of Stampin Up ink to get different colors for the flowers. I used Garden Green and Glorious Green in the Bella Rose Leaves. I cut two of the Bella Rose leaves out and adhered to the card. Then arranged and adhered the flowers. Added the bow and yellow stickles to finish my card.
Thanks fro dropping by, hope you have a wonderful week!!!


Wednesday, May 20, 2015

Wednesday with Heartfelt Creations


Hello and welcome to another Wednesday with me and my new creation using the wonderful papers, stamps and dies from Heartfelt Creations.

Products Used:
Cascading Fuchsia Paper Collection
Cascading Fuchsia Cling Stamp Set
Open Leaf Cling Stamp Set
Botanical Wings Cling Stamp Set
Delightful Daisies Cling Stamp Set
Botanical Rose Cling Stamp Set
Delightful Daisy Die
Botanical Wings Die
Classic Leaf Die
Cascading Fuchsia Die
Luggage and Tags Die
Deluxe Flower Shaping Kit
Art Institute Glue - Dries Clear
Scor-Pal Measuring & Scoring Board

Project Instructions:
Other Products: Stampin Up Ink/Markers Orchid Opulence, Positively Pink, Glorious Green, and Garden Green; Corner Rounder and Yellow Stickles.
Instructions: For instruction on how to cut the box out go here. After I had my box cut out and made, I stamped all the flowers, leaves and Butterfly. Then I cut everything out. Color and shape. I did use Stampin Up inks to color and shade. I adhered everything in the way I liked and then cut the tag out and added Stickles to finish.
Thanks for taking time to drop by........

Monday, May 18, 2015

Get Well Card

Morning, hope everyone had a fantastic weekend and geared up and ready for another week.  I'm going to start my week off by sharing the second card I made last week for Heartfelt Creations, hope you enjoy...
Products Used:
Cascading Fuchsia Paper Collection
Heartfelt Sentiments Cling Stamp Set
Decorative Oval Die
Everyday Hero Newsprint Cling Stamp Set
Everyday Heroes Die
Stamp Positioner Kit
Scor-Pal Measuring & Scoring Board
Zip Dry Paper Glue
Art Institute Glue - Dries Clear

Project Instructions:
Other Products: Ribbon, Liquid Pearls.
Instructions: Prepare your card base at 5" x 7", cut a piece of the Cascading Fuchsia Paper down to 4 3/4" x 6 3/4". Now cut another piece of white 4 1/2" x 6 1/2", run the Decorative Oval Die through your die cut machine saving both parts. Adhere the white on top of the piece of Cascading Fuchsia paper the add the Decorative Oval on top matching it up as shown. Stamp both the sentiments and cut out using the dies. Adhere to card, add bow and to finish add liquid pearls to each flower in the oval plus around the edge.
Thanks for taking the time to drop by, have a great week and I'l see you Wednesday with more Heartfelt Creations....

Wednesday, May 13, 2015

Wednesday with Heartfelt Creations

Heartfelt Creations invites you to join us for a stroll through a quaint cottage garden where your cares will melt away and your creative energy will be refreshed and renewed.  The Cascading Fuchsia Collection of stamps, dies and papers is bursting with lush greenery and exquisite beauty.  Here, you'll find pendant shaped clusters of show-stopping pink, purple and magenta blossoms that are also called "Angel's Earrings."  Graceful vines, lacy patterns, flitting butterflies, shady bowers and delicate latticework come together and form this restful haven.  It's a celebration of the simple things that fill this moment in time with wonder and spontaneous joy.  Cascading Fuchsia: It's a flawless garden of peerless delight and a creative sanctuary for the artist in you.

Products Used:
Cascading Fuchsia Paper Collection
Fuchsia Bouquet Cling Stamp Set
Heartfelt Sentiments Cling Stamp Set
Deluxe Flower Shaping Kit
Stamp Positioner Kit
Scor-Pal Measuring & Scoring Board
Zip Dry Paper Glue
Art Institute Glue - Dries Clear

Project Instructions:
Other Products: Prismacolor Pencils 909; 994; 1008, Stickles, 2mm thick foam dots.
Instructions: Prepare your cad base at 5" x 7", cut a piece of the Cascading Fuchsia Paper down to 4 7/8" x 6 7/8". Now cut another piece of white 4 1/2" x 6 1/2", stamp the Fuchsia Bouquet image and color. Stamp it 3 more times, color and cut out parts as shown to pop dot up. Adhere all layers to the card. Using the scor-pal, score 3 times and both the top and bottom, I did 6", 6 1/8", the moved to the 6" and scored again. Now using the Stamp Positioner, stamp the sentiment. To finish your card add stickles.
 Thanks for dropping by...


Wednesday, May 6, 2015

Wednesday with Heartfelt Creations

Hello and welcome, I have a brand new card to share with you today and hope you enjoy it.

Products Used:
Peacock Paisley Paper Collection
Delightful Daisies Cling Stamp Set
Botanical Wings Cling Stamp Set
Beautiful You Cling Stamp Set
Delightful Daisy Die
Decorative Flower Pot Die
Botanical Wings Die
Luggage and Tags Die
Deluxe Flower Shaping Kit
Art Institute Glue - Dries Clear

Project Instructions:
Other Products: Ribbon, Gems, Stickles, Versa Mark, White Embossing Powder.
Instructions: Prepare your card base 5" x 7" and adhere the card front from the Peacock Paisley Pack. Next cut one of the journal tags and a small piece of the paper at an angle. Stamp the leaves, flowers and butterfly. Cut everything out, color shade, and shape. Arrange the flowers and leaves, add tag and bow. To finish the card add gems to the flower centers and Stickle to the butterfly.
'Be sure and check out Heartfelt 's blog this morning for a sneak preview of what's coming next week, I promise it will blow you away.....