Friday, February 27, 2015

Best Wishes....

Hello, here to  share the second card I made this week for Heartfelt Creations, hope you like!!
Other Products: Pretty in Pink Stampin Up Marker, YoYo Yellow Stampin Up Marker.
Instructions: Prepare a card base of 5" x 7". Cut one of the card fronts out of the paper collection, distress all 4 sides and adhere to the card base. Stamp all the flowers, butterflies and leaves. Color, cut out, shape and adhere to the card as shown. Add your sentiment tag and glitter to finish the card.

Wednesday, February 25, 2015

Wednesday with Heartfelt Creations

Hello crafters, and welcome to Wednesday with Heartfelt Creations.  I'm pleased to share my card with you today...hope you enjoy!!!
Other Products: Ribbon, Distress inks, Anna Griffin Embossing Folder.
Instructions: Prepare your 5" x 7" card base, cut a piece of purple card stock 4 3/4" x 6 3/4", dry emboss and set aside. Using a piece of the white that you cut off 1 1/2" x 6 3/4", and using the scor pal, scor down both long sides using the first 3 slots. Stamp your butterflies, flowers and leaves. Color, cut out, shape, shade and set aside. Cut your tag out using the tag die. Start putting it all together using the small piece first, wrap the ribbon around and adhere to card base. Now arrange all the leaves and flowers to your liking. Add butterflies and tag. To finish add stickles to the center of each flower.

Friday, February 20, 2015

Uplifting

Hello, I'm here to share a card I made for a friend who lost her Mother last week.  It's always sad making sympathy cards but it's something we all have to do from time to time.
I used papers from Paper Temptress and stamps and dies from Heartfelt Creations.
this card is 7 1/4 x 7 1/4, I know it's big but I wanted to load it up with flowers.  I started  cutting the Heavenly White#80 down to 7 1/4 x 7 1/4, the next piece was 8 1/4 x 7 1/4, scored at 1 inch and attached the two making the card base.  Next cut a piece of the Eclipse Black 7 x 7 and adhere to card base.  Cut the next piece 6 3/4 x 6 3/4, using Martha Stewart's Vintage Floral punches, went all the way around and adhere to card.  Cut a piece of red 5 1/2 x 5 1/2, round the corners and  add, cut another piece of the white 5 x 5, use the punches and then stamp the sentiment, turn this piece as shown and adhere to card.  Stamp the leaves and flowers, cut out, color, shade, shape and adhere to card.  Cut the swirls out and adhere to card.
Products from HC used:
3312 Uplifting Scriptures Cling Stamp Set
3651 Botanical Rose Cling Stamp Set
3545 Open Leaf Cling Stamp Set
758 Botanical Wings Die
747 Arianna Lace Die
736 Classic Leaf Die
Distress inks Peeled Paint and Forest Moss
Gold Micro Beads
Glitter
Thanks for dropping by, hope you liked the card.


Thursday, February 19, 2015

Botanical Wings

Sharing the second card I made for Heartfelt Creations this week....
Other Products: Micro Beads, Dusty concord and Mustard Seed distress inks.
Instructions: Prepare a card base of 5" x 7". Cut one of the card fronts from the paper pack and adhere to the card base. Stamp the flowers, leaves and butterfly, color, cut out, shade, shape and adhere to the card. To finish add glitter.
Thanks for dropping by today, I'm going to visit blogs today, didn't get a chance to yesterday.

Wednesday, February 18, 2015

Wednesday with Heartfelt Creations

Hello crafty friends, are you ready for some new Heartfelt Creations???  Here is the first of my weekly creations...


Other Products: Stampin Up border punch, Lavender Lace, Eggplant Envy and Wild Wasabi card stock, and Micro beads.
Instructions: Prepare your 5" x 7" card base, cut a piece of the paper collection paper 5" x 7" and distress all 4 sides. Adhere to the card base. Cut a piece of Eggplant envy 3" x 7", punch down one side and adhere to card. Tear a pice of the Lavender Lace down both sides keeping it at 2 1/2" wide, add to card along with a piece of the paper from the collection 2" wide on top of that and set aside. Cut the Bella Rose die out and just use the swirl part, stamp the leaves and flowers, cut out, color, shade and shape. Adhere to the card. To finish add microbeads to the center of each flower.
 

Friday, February 13, 2015

Wishing you the Best


Hello, here to share the second card I made this week for Heartfelt Creations, hope you enjoy....

Products Used:
Butterfly Medley Paper Collection
Botanical Rose Cling Stamp Set
Botanical Wings Die
Raindrops on Roses Die
Bella Rose Die
Art Institute Glue - Dries Clear
Metal Glue Tip - Art Institute
Paper Blossoms Tool Kit
Paper Blossoms Molding Mat
Zip Dry Paper Glue
Shell White Glitter

Project Instructions:
Other Products: Walnut Stain Distress Ink, Stampin Up So Saffron Card stock, Stampin Up Wild Wasabi card stock.
Instructions: Prepare a card base of 5" x 7". Cut another piece of white 4 7/8" x 6 7/8". Cut the Raindrops on Roses die out right in the center and then add the So Saffron behind it, replace the piece you just cut out and adhere all to the card base. Cut the Bella Rose vine out, all you will use is the swirl part so trim the leaves off and set aside. Now stamp your leaves and flowers, cut out, shade with the distress ink, shape and adhere to the card. Now place the Bella Rose swirls at the top and bottom. Finish by adding glitter and the sentiment you cut out of the paper pack.

Wednesday, February 11, 2015

Wednesday with Heartfelt Creations

Happy Heartfelt Creations Wednesday!  This is the second Wednesday in February, and that means it’s time for another fabulous release from Heartfelt Creations! This week, we are introducing another gorgeous springtime collection: Butterfly Medley. 

Are you longing for springtime…dreaming of sunny hours spent in a lavish flower garden where butterflies flit lazily from blossom to blossom? Heartfelt Creations invites you to revel in the beauty of springtime with the release of the Butterfly Medley Collection of stamps, dies, and papers. This uplifting collection is bursting with bountiful botanical roses and a kaleidoscope of fanciful butterflies. Soft shades of pastel peach, lilac, sage, lemon, teal and pink are the perfect counterpoint for the bleak, grey days of mid-winter. Beautifully landscaped backgrounds include pastel plaids, cheery polka-dots, flowing script, classic stripes, elegant flourishes, seed packets, garden themed sentiments and images. Six hand drawn stamp sets featuring botanical roses and butterflies can be paired with two sets of dies, allowing you to stamp and die cut a host of embellishments with a single pass through your die cutting machine. You’ll dream in beauty, plant seeds of encouragement and reap a harvest of creativity when you design with the Butterfly Medley Collection from Heartfelt Creations.
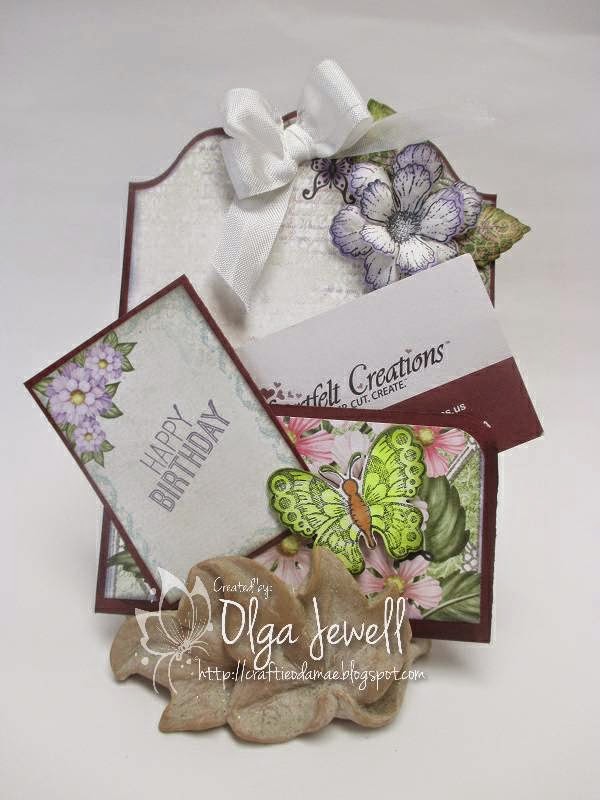
Products Used:
Butterfly Medley Paper Collection
Butterfly Medley Cling Stamp Set
Botanical Rose Cling Stamp Set
Summer Glory Cling Stamp Set
Botanical Wings Die
Butterfly Medley Die
Art Institute Glue - Dries Clear
Metal Glue Tip - Art Institute
Stamp Mat Pad
Paper Blossoms Tool Kit
Paper Blossoms Molding Mat

Project Instructions:
Other Products: Ribbon, Spellbinders Labels 20, Corner Rounder, Distress inks, Spectrum Noir Markers TN6 & FL3, Scor-tape 1/4", Spellbinders Grand Calibur.
Instructions: Begin by cutting a piece of dark card stock down to 4" x 8". Using the largest die in the labels set, turn long ways and cut making the top part of your gift card holder, round the corners at the bottom, score at 2 1/4" and fold up using scor-tape to hold it together. Next, choose the pattern paper from the Butterfly Medley and trim down to 3 7/8" x 5". Again using the largest die from the labels set, cut the top part and adhere to card inside using the clear adhesive. Cut another piece 3 3/4" x 2", round 2 corners and adhere to the lower part of the holder. Cut a piece of the dark 2" x 2 3/4", adhere a piece of the pattern paper on top 1 7/8" x 2 1/2". Stamp the sentiment in the center and attach to card. Stamp the flowers, leaves and butterfly. Color, cut out, shade, shape and adhere to card. To finish add bow and stickles to the center of the flower.
Thanks for taking time to drop by, I want to invite you to check out my team mates for more inspiration!

Friday, February 6, 2015

Fluffy Birds

Hello, here is the second card I made this week using the wonderful stamps and dies  from HC and the fantastic paper from Paper Temptress, hope you enjoy!!!!
Products Used:
Fluffy Birdies Cling Stamp Set
Birds and Blooms Cling Stamp Set
Birds and Blooms Die
Art Institute Glue - Dries Clear
Metal Glue Tip - Art Institute
Paper Blossoms Tool Kit
Paper Blossoms Molding Mat
Zip Dry Paper Glue
Dove Blender Kit
Crystal Ultrafine Transparent Glitter

Project Instructions:
Other Products: Spellbinders Timeless Rectangles, Grand Calibur, Paper Temptress paper Cryogen White, Stamped on Heavenly White #80, Bubblegum Pink, Distress inks Forest Moss, Color Box Petal Point Wildflower, embossing folder, Scor-Pal foam tape.
Instructions: Prepare your card base to 5" x 7", cut another piece of white 4 7/8" x 6 7/8" and dry emboss with a folder of your choice. Cut the pink out using the Spellbinder die, cut the next size out and stamp your image on it. Color the image and set aside. Stamp the birds, color, cut out, shape and set aside. Now adhere everything to the card base. I used foam tape to adhere the image on the pink and to the back of the birds. To finish the card add glitter.

Wednesday, February 4, 2015

Wednesday with Heartfelt Creations

Hello my wonderful crafty friends........ready for some new Heartfelt Creations??  Just think, this is my first post as a retired crafter, that alone is exciting for me!!!!!!
Other Products: Darcie Brick Wall embossing folder, Prismacolor Pencils: 909; 994; 993.
Instructions: Prepare your card base to 5" x 7", cut another piece of card stock 4" x 6", place it in the embossing folder and run it threw your machine. Adhere to card, stamp the flowers and leaves, color, cut out, shape and adhere to the card. Cut out one of the tags from the paper collection using the tag die, using the 3D-Dots attach to the card. To finish the card add yellow liquid pearls.
That about does it for me, today, be sure and drop by HC's blog for a sneak peak of the next release and my team members creations for some gorgeous inspiration!